Showing posts with label Recipe. Show all posts

Monday, January 3, 2011

Wait, What?? 2011 already???

I don't know how it happened. Another year slipped by right out from under me and I'm not 100% sure I was fully conscious for parts of it.  Like summer.  I don't think I had a real summer. The cool summer weather in Southern California was much more recognizable as Fall or Winter than of an actual summer, hence my feeling of being cheated out of a summer.  Since my battle with time is a losing campaign, I must look ahead. 

2011 is a milestone year for me as I turn another decade older [Geez...did I just share that information???].  No longer will I be able to check off the 35 - 39 box.  Luckily, this time I'm not scared or freaked out as I was when I left my 20's. My 30's were fantastic years...I traveled, I worked, I ran, and I met a huge host of people.  I expect my 40's to be even better years since the things that worried me in my 20's and 30's seem so insignificant compared to the bigger picture of life.  I've learned to appreciate people and things so much more now that I've actually had a chance to live a little.

Losing a dear friend who barely turned 30 opened my eyes to what really matters in life - good health, good friends & family members, and just being - having the opportunity to wake up in the morning or sleep in all day. Yes, having a job is important but is having a job that you hate more important than your general well being? That's for you to decide...I'm blessed with a job that I love and am excited to go to every single day.  I took a pay cut when I first came to this job because it meant more to me to love my job than what I had in my bank account. 

This past year, I've had the opportunity to develop my other passions - knitting, cooking and traveling. Most importantly, I've been richly blessed by all the people I've met and now call "friends".  While they are too numerous to mention here [and you know who you are!!!], each person I have met has enriched my life for the better and I appreciate you. The Japanese have a New Year's saying, "Akemashite omedetou gozaimasu.  Kotoshi mo yoroshiku onegai shimasu," or "Happy New Year. I hope to count on you again this year."

At the beginning of this New Year, I'd like to share with you my favorite sweet, hoping that it'll leave a sweet taste in your mouth all year long - The Scotchmallow.  See's candy makes this and I literally dig through the box to seek it out.  All other chocolates in the box are rubbish as far as I'm concerned.  

I've been dreaming about this candy for weeks and sadly, I didn't receive one box of See's candy this year.  It was something I had to rectify by making my own.  The best caramel recipe came from La Fuji Mama's site.  The easiest marshmallow recipe was Alton Brown's.  Combine these two and you get the ScotchMallow!

Caramel Recipe:
Obtain from La Fuji Mama's Creamy Caramel Recipe.

Instead of boiling to 245 degrees, bring it down to 235 - 240 degree soft ball stage on your candy thermometer.

Directions: Line a 9 x 13 pan with parchment paper so removal will be easier.  Pour caramel into pan and allow to cool completely.  Gently wipe off with a paper towel any excess grease/oil.

Marshmallow Recipe
adapted from Alton Brown
Ingredients:
3 packages unflavored gelatin
1 cup ice cold water, divided
12 ounces granulated sugar
1 cup Glucose Syrup [or Light corn syrup]
1/4 teaspoon salt
1 teaspoon Vanilla Extract
Powdered sugar for dusting

Have a cookie sheet lined with parchment paper or silpat prepared and dusted with powdered sugar so the mixture will not stick to the liner.

Place 1/2 cup of water with the gelatin into your mixing bowl, set aside.

Combine remaining water, sugar, glucose syrup and salt in a heavy saucepan and cook until it reaches 240 degrees on your candy thermometer.  Remove from heat immediately.  

Turn mixer on slow speed and slowly pour syrup into mixing bowl [using a stand mixer will be so much easier than a hand mixer].  Once you have added all the the syrup into the mixing bowl, turn on high and mix until the marshmallow becomes lukewarm, approximately 10 - 15 minutes.  Add vanilla about 20 - 30 seconds before you are ready to turn off the mixer.

Pour a little more than half the marshmallow batter over the caramel using an oiled or wet spatula. Flatten out as much as possible and sprinkle powdered sugar over the marshmallow.  Allow to set for approximately 4 hours.

Pour the remaining batter on to the cookie sheet, sprinkle with more powdered sugar and allow to set.  You can use this marshmallow for hot cocoa or smores!

When the caramel/marshmallow mixture has set, turn out onto a cutting board and cut into squares or desired shapes.  I was lazy and didn't want to spend hours dipping them so I made them fairly large.
Chocolate sauce: 
I opt to microwave my semi sweet chocolate morsels 1 cup at a time.  Dip each caramel/marshmallow into the chocolate sauce and place to dry on a parchment lined cookie sheet.

I think I may have put my colleagues into sugar shock this morning so it really is better if you cut these into 1" squares instead of the 2" behemoths that I made.  

Sunday, December 19, 2010

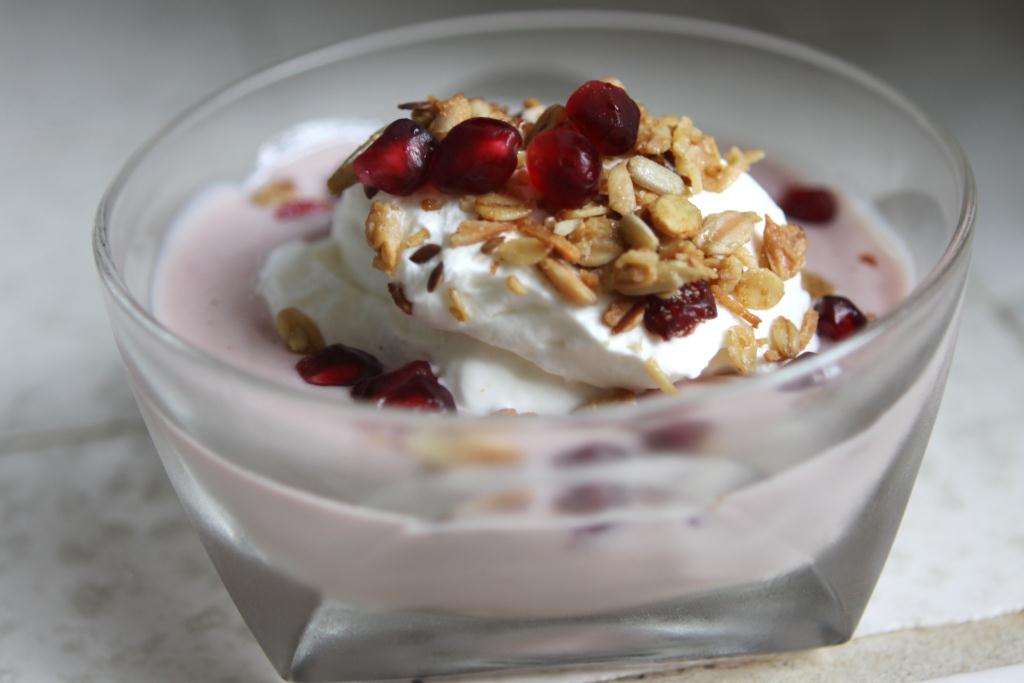
Pomegranate Yogurt Parfait

Every year, I host a Christmas brunch or dinner for a few of my girlfriends.  This Christmas season seems to have gotten away from me and left me feeling a little under the weather.  I decided that quick and easy was the way to go.

One thing that was ridiculously easy but so tasty was my pomegranate yogurt parfait. Personally, I suspect it may have been the dollop of whipped cream that was the true winner and reason why my friends loved it so much, but the most important thing was that they enjoyed it!

Pomegranate Syrup
16 oz PomWonderful Pomegranate Juice
1/4 - 1/2 cup sugar
Juice & Zest of 1 lemon

Combine all ingredients and cook, stirring occasionally, until the mixture is thick enough to coat the back of a spoon.  If you can draw a clear line through the coating of Pom Syrup with your finger, then it is ready.

Whipped Cream:
16 oz of heavy whipping cream
1/4 cup sugar
1 tsp vanilla
Whip cream, sugar, vanilla together.

Vanilla Yogurt [or Plain Greek Yogurt]Granola
Pomegranate Arils

Mix Pomegranate Syrup with the Yogurt until well blended. Add dollop of whipped cream, top with Granola & Pomegranate Arils.

Tuesday, December 14, 2010

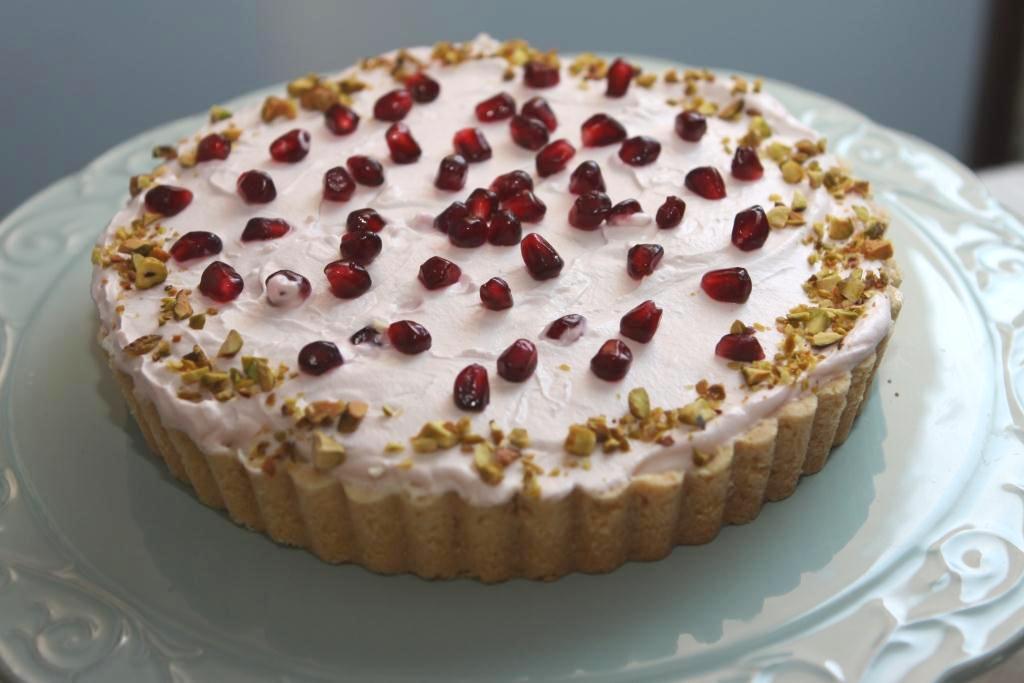
Share Our Holiday Table: Pom Pie Delight


More than 17 million children struggle with receiving regular nutritious meals every day.  This doesn't happen in some far off land.  It happens right here in the USA.  During the season of lavish parties, gifts, and merriment, many are struggling with receiving the most basic of needs.  
How you can help: go to the Share Our Holiday Table's donation page and PLEASE make a donation. 

How I'm helping: When my friend, Gaby, asked if I'd like to participate in a progressive blogger dinner to raise awareness of childhood hunger in the US, I jumped at the chance. I love this community I'm involved in and am always thrilled when I have the opportunity to join others in such a wonderful event.
My contribution is dessert, my favorite part of any meal.  I'm not a big fan of overly sweet desserts so it took me a while to Frankenstein this dessert from various other recipes I had in my file and tweak it a bit.  The shortbread crust is just buttery enough to pull it together beautifully; the tangy cream cheese is lightened up with whipped cream; and it's topped with a wonderfully tangy sweet Pomegranate Mousse that just tastes like silk in your mouth.

Crust:
2 cups flour
1/4 cup sugar
1 cup cold butter, cubed [2 sticks]
3/4 cup pistachio nuts [optional]

Place flour & sugar into a food processor and pulse twice. Add chilled butter and pulse several times until the texture is grainy.  If you don't have a food processor, use a pastry blender or 2 forks to get to the grainy texture. Add nuts at this point. Press all the ingredients into a 9x13 pan or less than 1/2 the ingredients into a 8" tart pan. Bake at 350 for 15 - 20 minutes.  Let cool.


Cream Cheese Filling:
1 8oz package of Cream Cheese, room temperature
16 oz of heavy whipping cream, whipped with 3 tablespoons sugar
1/4 - 1/2 cup of sugar, suit to taste
1 tsp vanilla

Blend Cream Cheese with sugar until well combined.  Add vanilla, fold in whipped cream.  Pour on cooled crust and refrigerate until set.

Pomegranate Mousse topping:
8 oz PomWonderful 100% pomegranate juice
1/3 cup sugar
Juice from 1/2 lemon
Zest from 1 lemon
1/2 package of gelatin
8 oz heavy whipping cream, whipped with 1 tablespoon sugar and 1/2 tsp vanilla

Combine PomWonderful Pom Juice, sugar, juice, and zest in a medium sized saucepan. Reduce until half or until it reaches a syrup consistency [should coat the back of a spoon].  Let Cool. Once the Pom syrup has cooled, fold into whipped cream.  Pour over cream cheese filling and refrigerate until set.

Decorate with Pistachio nuts & pomegranate arils, if available.

For more recipe ideas, please visit the talented and lovely blogs of my foodie friends.


December 14: Dessert
Gourmet
Family Friendly
Vegetarian
Gluten Free
December 13: Sides
Gourmet
Family Friendly
Vegetarian
Gluten Free
December 10: Entrees
Gourmet
Family Friendly
Vegetarian
Gluten Free
December 9: Soup
Gourmet
Family Friendly
Vegetarian
Gluten Free
December 8: Salads
Gourmet
Family Friendly
Vegetarian
Gluten Free
December 7: Drinks
Gourmet
Family Friendly
Vegetarian
Gluten Free
December 6: Appetizers
Gourmet
Family Friendly
Vegetarian
Gluten Free

Sunday, December 5, 2010

Agedashi Dofu


I had the most amazing Agedashi Dofu the other night. My friend's [Fuyumi] mom is an incredible Japanese cook so when Mrs H asked me if I'd like to help out at a dinner she was hosting, I jumped at the chance. One thing to note about Japanese Cuisine is that it is very labor intensive.  Making renkon [lotus root] and carrots look like little flowers may have looked lovely but I was ready to stab myself over the laboriousness of it all.  Not to say that I'm not going to do that for my family's New Year's party. I think the memory of how long it really took will be gone by the time New Year's comes around.

There were so many wonderful items on the menu but my favorite was definitely the Agedashi Dofu. Deep fried tofu steeped in salty sweet richness of the tsuyu [soup], it was impossible to resist. This was always something I would only order at restaurants, but Mrs H assured me that this was the easiest thing in the world to make. She was right. 

Firm tofu tends to be easier to handle but I prefer the consistency of the softer silken tofu, which makes for a creamier inside of the crispy shell.  Press out as much of the water as possible [my mom uses jars filled with water placed on top of plates, placed on top of the tofu]. 

I've seen various types of batter from tempura and flour to katakuriko [potato starch]. Mrs H uses katakuriko to flour the tofu.

After heating up the oil, gently drop the tofu into the oil and allow to deep fry until the exterior is firm and crisp. Turn over and repeat.

Top the tofu with various colorful items such as spinach, katsuobushi, green onions, daikon sprouts, asparagus, tomatoes, grated ginger & daikon. Pour the tsuyu over the tofu and serve immediately.

Best dish ever.

Tsuyu Base:
1 cup dashi [my friend, Rachael, has a WONDERFUL explanation on how to make it!]
2 Tbsp Shoyu [soy sauce]
2 Tbsp Mirin [Sweet Rice Wine]

Combine tsuyu ingredients and keep warm until ready to use.

After draining tofu of water, coat tofu with flour. Deep fry until shell is crisp and firm. Pour Tsuyu base over tofu.

Thursday, August 26, 2010

Chocolate Chip Rice Crispy Cookie

I worked in a bakery in high school, with occasional appearances in college.  I never baked anything [I would've burned that place down] but worked the counters selling stuff. Even though I have the worst sweet tooth, I have a hard time going into any bakery because of its cloyingly sweet smell.  Oh, the dilemma - The need for sweet vs the smell of a bakery.  That's probably why I started baking so much more on my own.

There was one cookie that I loved above all the cookies they had that would still cause me to return to the bakery every so often.  The Chocolate Chip Rice Crispy Cookie.  Throughout the years, I'd try to re-create the cookie using recipes that I found or basic chocolate chip cookie recipes - none of it was quite right.  It was always a little too fluffy, too sweet, too bland.  I don't know why it took me so long to figure out what I was doing wrong [brown sugar...less flour, etc] but finally it hit me like a ton of bricks.  The perfect Chocolate Chip Rice Crispy Cookie.  It's not exact but with the Sucanat sugar, it's got this whole new dimension of rich flavor...I think I like it even more!


Chocolate Chip Rice Crispy Cookie
Ingredients:
1/2 cup butter
3/4 cups sucanat sugar [or brown sugar]
1 egg
1 tsp vanilla extract

1 1/4 cup flour
1/2 tsp baking soda
1/4 tsp salt

2 cups puffed rice cereal [or cocoa crispies]
6 ounces semi sweet chocolate chips

Method:
Preheat oven to 325 degrees.

Cream together butter, sugar, egg and vanilla extract until well combined.  Add flour to mixture.  Fold in puffed rice cereal gently so as not to break up the puffs.  Incorporate chocolate chips.

Bake for 10 - 15 minutes.

Sunday, August 8, 2010

Pound Cake with grapefruit glaze

My mom is pretty convinced that I am this close to being diagnosed with diabetes. She has begged me to stop baking for my own good before the decision to stop eating sweets is taken away from me. I tried. I really did. I just don't get the same thrill cooking as I do when I bake.  So I've just taken to baking without letting her find out.  The only problem is that I can't hide that extra 10 - 15 pounds I've gained from "taste testing" the goods.

Having to taste test this recipe was tough.  Sweet tart grapefruity goodness.  Dense.  Rich.  Just my kind of dessert.  Or it would be if I partook of this.  But I wouldn't think of it.  My mom would kill me and I wouldn't have to worry about diabetes.

In an effort to appease my mother's concern I've taken up eating grapefruits instead.  Low in sugar compared to other fruits, I thought that this would be the ideal fruit to use.  [Let's ignore the fact that I added a ton of sugar to the grapefruit juice for the glaze]

Pound Cake:
3 sticks unsalted butter, softened
3 1/2 cups sugar
5 eggs
2 tsp vanilla extract
3 cups sifted cake flour
1/2 tsp baking powder
1 tablespoon finely grated grapefruit zest
1 cup buttermilk

Preheat oven to 300  degrees.  Butter & flour pans.

Combine butter and 3 cups of sugar until light and fluffy.  Add eggs, one by one, beating thoroughly until well blended.  Beat in vanilla.

In a separate bowl, sift together flour and baking powder. Add zest, mix well.  Beat flour mixture into butter mixture, alternating with buttermilk.  Be sure to scrape down sides of bowl every so often to combine.

Pour batter into pans.  Bake until golden brown and you can poke a wooden skewer into the cake and it comes out crumb free [for loaf pans, approximately and 60 minutes; for bundt pan approximately 90 minutes]

Transfer cake in pan to wire rack.  Poke cake through in several places using wooden skewer.  Brush with half the glaze [recipe below].  Keep in pan for approximately 10 minutes, then release and brush cake with remaining glaze.

Grapefruit Glaze [i used an Oro Blanco so used less sugar, same for ruby red]
1/2 cup grapefruit juice
1/2 cup sugar or to taste

Hide cake from mom and enjoy!

Thursday, April 29, 2010

New Orleans: Cochon Butcher

Another good title for this post could be "Jenny in Hog Heaven".  I had read some articles on Cochon Butcher before going to New Orleans and just loved the irreverent nature of the joint.  I mapped out the location and found that it was a little over a mile from where I was staying.  In between all my meetings, I didn't think I'd be able to make it over there.  That was until my contact at the hotel told me he makes it a point to get over there at least 3 times a week.  That's when I made it a point to get over there.

I was glad I did.  They cure their own products there upstairs from the Butcher.  I just so happened to come upon a whole hog being lugged into the building. If you're ok with seeing a dead hog being dragged into the building then click HERE. If you don't then DON'T.

I walked in with the intent to buy a sandwich.  I was instantly distracted by the selection of cured meats.  And bacon praline.  
If you have to ask if I bought any bacon praline, you don't really know me.  At all.

I added kurobuta bacon and salami to my goodies. The salami was so spicy and flavorful, probably one of the best I've had! I wish I bought more. As for the bacon, well, if I could snort the bacon, I would.  It was heavenly.
Upon the recommendation of my hotel contact, I ordered the Cochon Muffaletta, well done.  Warm, cheesy, gooey rich...DELICIOUS sandwich.
Man. I wish I still had a taste of that.  It was fantastic.

I came home from work tonight with the thought that I'd fry up the bacon and sautee some onions in the bacon oil and toss some of my mom's fava beans in.  Unfortunately, I waited too long and the fava beans weren't green any longer. 
So I did something very bad.  VERY bad. I made pasta drenched in bacon grease.  And it was good.  Don't let the arugula fool you.  


Sauce:
2 slices Kurobuta Bacon
1/4 cup diced onions 
1 clove garlic [I really like garlic so I used 2]
1 cup Fava Beans, shelled
1 cup arugula
Salt, pepper to taste
Grated Parmesan
Pasta:
2 inches, whole wheat Spaghetti Pasta
salt
For the pasta: 
Cook per directions on box. Drain and set aside.
For the sauce:
Boil shelled fava beans for approximately 5 minutes.  Take off outer layer.  Set aside.

Fry 2 strips of bacon until crispy.  Remove bacon and drain on paper towel.  

Add onions to the bacon grease, then the garlic, fry until translucent. Salt and pepper to taste.  
Remove from heat.  Add the fava beans, arugula, and pasta, mixing well.  Top with grated parmesan. 

If you're ever in New Orleans, please visit:
Cochon Butcher
930 Tchoupitoulas
New Orleans LA 70130 
504.588.PORK
mon-thu 10–10
fr+sat 10-11
sun 10-5

Wednesday, April 21, 2010

Lilikoi Chiffon Cake


Nothing conjures up the taste, smell, and images of Hawaii than the taste of Lilikoi [passion fruit].  Well, nothing except for the smell of salty sea air, warm balmy breezes, tuberose, shave ice, and plate lunches, of course.  Combine the tart sweetness of Lilikoi curd, airy clouds of whipped cream, with a chiffon cake and you've got yourself a recipe for a little taste of fluffy heaven.

Chiffon cakes are deceptively easy to make [especially if you've tried your hand at macaronage].  One way to help ensure that the cake achieves its airy and fluffy consistency is the use of cream of tartar, which will help stabilize and give more volume to the egg whites.  Of course, the first time I made it, I was so focused on  whipping the egg whites  to perfection that I completely forgot to add the baking powder and salt.  My victims co-workers actually liked it though so no harm was brought to my victims co-workers. I've made it twice for them and they cleared it up both times.
Lilikoi Curd
6 eggs
6 egg yolks
1 1/3 cup sugar [I used a little more than 3/4 of a cup, i don't like it too sweet]
1 1/4 cup lilikoi puree [not sweetened]

Whisk together the eggs with the egg yolks in a heatproof glass bowl.  Add the sugar and lilikoi puree.

Set a heatproof bowl over a pot of boiling water [the bottom should not touch the water].  Stir mixture constantly until it thickens.  Mixture should coat the back of a spoon.  Pour through strainer to get rid of lumps.

Chiffon Cake
9 eggs, separated
1 teaspoon cream of tartar
1 cup + 1/2 cups sugar 
1 1/2 cups cake flour
1/2 teaspoon salt
1 tablespoon baking powder
1/2 cup water
1/2 cup cooking oil
1 teaspoon vanilla extract [or you can use 1 teaspoon of lemon zest]

Beat egg whites with cream of tartar until it reaches the soft peak stage.  "Shower" in 1/2 cup of sugar while beating until stiff and glossy.  You should be able to turn the bowl upside down without the egg whites falling out.  Set aside.

Sift together remaining cup of sugar, cake flour, salt, and baking powder.  Add egg yolks, water, oil, and extract [or lemon zest].  Beat until smooth.  

Add the egg whites to the yolk mixture. Using a rubber spatula, fold the mixture  gently in a circular motion until combined. 

Pour into three 8 inch round pans [I set parchment paper on the bottom of each of the pans], baking 40-45 minutes at 350 degrees F.  Use skewer or toothpick to test for readiness.

Flip the cake over to cool upside down [still in the pan].  When its ready I like to squish the cake down so it tears away from the sides of the pan.  It's a chiffon so can withstand the "squish" techniques. [If it seems to be sticking too much to the sides, simply run a knife along the edge to separate.]

Whipped Cream Frosting
taken from Joy of Baking
1 1/2 cup heavy whipping cream*
1/2 teaspoon vanilla
1 tablespoon sugar

I'm not sure if there's a difference but they said to chill the whisk, bowl, and ALL the ingredients to achieve maximum volume.  So I did it.  I whisked the above ingredients together.  This reminds me of the whipped cream frosting that they use at Angel Maid Bakery [my very first real job!].


*I used the organic heavy whipping cream from Trader Joe's since it's not ultra pasteurized. It tastes MUCH better than the Ultra Pasteurized variety.

Assembly:
I cut the 8" rounds in half so that each cake pan gave me 2 rounds [there was something oddly too dense about this chiffon cake that i made above so I decided to re-do it again.  Turns out I forgot to add in baking powder.  Thus, the actual number of rounds should be 3].  I started with the lilikoi curd on the first layer, stacked on the next cake, then layered the whipped cream, stack on the next cake, so on and so forth until it's fully assembled.  Frost cake around using the whipped cream frosting.  Try not to eat the majority of it like I did. 

Thursday, March 18, 2010

Cornflake Chicken: Mommy & Me Series

Growing up as a Japanese American in a large Japanese community, there were a lot of opportunities for various potlucks - church, community centers, sport teams, Japanese school, dance group, and on and on. The unspoken rule was that each family should bring enough food to feed their own family.  Each potluck brought a vast array of home made foods causing the tables to groan with the weight.  Imagine plate after plate of sushi, teriyaki, beef/asparagus rolls, salads, somen salad, and desserts galore and there you have the quintessential Japanese Potluck.  My mom used to complain that my eyes were bigger than my stomach - I wanted to try everything.  I used to embarrass her with my 6" high plates that I couldn't possibly finish [and it was SO un-Japanese to indulge in such gluttony]. 

My mom had several dishes she used to rotate to these various events.  One of my favorite things that she used to make was something she called "cornflake chicken".  Crispy on the outside, juicy on the inside.  She was a full time working mom with 3 kids, so she had to make what was quick and easy.

This is a 2 part dish: the sauce and the chicken.  The sauce is really easy to make and it's the basic recipe for teriyaki - shoyu, mirin, sake, and sugar. Bring this to a boil until the sauce is reduced and thickened.  I try not to drink this up because that's kinda gross - even if it does taste really, really good. Make this first so that you're ready to dip the chicken after it is deep fried!  

Cut the the wings into 3 sections using kitchen shears [throwing away the tip of the wing - my mom actually yelled at me when I told her this because she said I should have made chicken stock with it.  Oops]. The chicken wings/drummettes are coated in flour,  shaking off any excess; then dipped in the beaten eggs; and finally, coated with the crushed up cornflakes.  The easiest thing to do is the put the cornflakes in a ziplock bag and crush the heck out of it so it's in smaller pieces.  Once you coat the wings/drummettes in flour and dunk it into the eggs throw 3 or 4 wings/drummettes into the ziploc bag and shake it around [you guys remember "shake & bake"??? exactly like that!!]

Your wings should look like this above. I used my wok to deep fry the chicken until cooked through.  Drain on a paper towel, then dip into the sauce.   


Sauce: 
1/2 cup soy sauce
1/2 cup sugar
1/2 cup sake
1/4 cup mirin

Bring all ingredients to a boil until thickened and reduced.

Chicken:
Chicken wings, cut up into 3 pieces, do not use wing tips
Flour
Eggs, beaten
Cornflakes, crushed in a ziploc bag
Oil for deep frying

Coat chicken pieces in flour. Shake off excess.
Dip into beaten eggs.
Toss pieces in the cornflake bag and shake, shake, shake!!
Deep fry in oil until chicken is cooked through.  
Drain on paper towel.
Dip into sauce.

Place on a bed of lettuce for decorative effect.  Use remaining sauce to cover the chicken.

Tuesday, March 2, 2010

Hinamatsuri [Japanese Girl's Day]: Traditions, Clothes, and Mochi


I love the cherry blossom season. We get it a little early in Los Angeles and since my parents are the only ones on the block who HAS a Sakura tree it's not quite the same as what you'd see in DC or Japan.  I still love how beautiful and delicate our tree looks! More than just simple beauty, it also gives me the leaves for my sakura mochi.
 
Why are you people tormenting me in this get up??
I don't know how many years my mom set up my Ohinasama display [the dolls you see in the background] and dressed me in a Kimono for Girl's Day, but the one thing I do remember is the Sakura Mochi. My mom used to make sakura mochi once a year for Girl's Day. That meant I had to stuff my chubby little face with as much mochi as I could handle on that ONE SINGLE DAY. I actually wasn't chubby (despite appearances in these photos to the contrary) and had a dismally small appetite but on that one day every year...I was a total gamer. 

oh, wait...you're going to give me sakura mochi?? YESSSSSS!

Sometime after elementary school, my mom stopped making sakura mochi for me. Every year since then I've casually hinted in big, loud words, "MOM, MAKE ME SAKURA MOCHI...PLEASE" to no avail - hell, my birthday is literally within two weeks of Girl's Day and she still won't make it for me. 

This year I mentioned to my mom that I was going to make sakura mochi and  she exclaims, "I want to make it, too!!" My momma didn't raise no fool.  My mom wants to make some, then I'm going over to her house to learn how to make it from the one who gave me my first taste! 

My mom offered to prepare the rice for the mochi so I offered to make the Anko.  My mom laughed out loud and I quickly realized the folly of my words. I looked over at my mom and said, "Geez.  That may have been a bad idea, huh?" She said, "well, I guess we'll see..." [As you can see, my mom has total confidence in my mad skills]. I would've made the white kind, which actually goes better with sakura mochi but I didn't have those kinds of beans.

My family is from the Okayama area of Japan...we're country people. As such, we really don't care for the pounded smooth, pretty mochi from the Tokyo area - I prefer the craggly rough rice textured mochi from the Kansai area, which just so happens to be the easier kind to make.

Tsubushi An Recipe:
1 cup Azuki Beans [available at Health Food Stores or Asian Markets]
1 cup sugar
3 cups water
Pinch Salt

Directions: 
Wash beans in cold water.  Bring beans to a boil  in a saucepan [faster if you cover with a lid] then drain water.  Add 3 cups of water and bring beans to a simmer over medium heat and cook until soft, stirring every so often [again, covering pot with a lid].  If the water evaporates before the beans are soft, add just a LITTLE bit of water [most of the liquid should be evaporated by the time its fully cooked]. Once it's cooked, add sugar, stirring the mixture, breaking up the beans so that most of the beans have been ground/mashed.


Mochi Recipe:
3 cups of Sweet Rice
Red food coloring
6 tablespoons sugar
pinch salt
salted preserved cherry leaves [pickle YOUNG leaves in salty water...my mom only had mature leaves, which are WAY too tough to eat]

Wash rice very thoroughly until clear.  Soak rice in water, dropping a few drops of red food coloring until the rice looks pink. Let sit for 4 hours. You can either steam the rice until cooked or cook it with ample water in a rice cooker. [this photo would've been a lot sharper but for the fact that my mom's a total spaz & doesn't understand that "photos" are not "moving pictures".]

Add 6 tablespoons sugar and pinch salt to rice and mix thoroughly crushing the rice as you mix.  [Again, "stop" does not mean anything to my mom.  She tell me that she's too busy to slow down.  Uhhh...heelllloooo...YOU'RE RETIRED.]

My mom taught me to use plastic cling wrap to lay about 2 Tablespoons of rice on, flattening out so that it's an oval shape so that the rice doesn't stick to my hands.  

Place about 2 teaspoons of tsubushi an in the center.
Fold the rice in half sealing the ends together.  

wrap with leaf and enjoy!

Sunday, February 28, 2010

Malasadas [Hawaiian Style Donuts]

The first time I tried Leonard's Malasadas in Hawaii, I thought I had died and gone to heaven.  The hot, soft pillows of deep fried goodness brought a tear to my eyes. I can still picture that first bite...not even my first experience at Cafe Du Monde's Beignets could take this place. 

I've made variations of Okinawa Dangos/Andagi before, but never Malasadas [you know...my whole fear of yeast thing].  I suddenly had this crazy craving for it last night so decided to make it for my Sunday morning breakfast...and use the photos to taunt my friend, Miles, who happens to *LOVE* malasadas.

It's a messy process so I wasn't able to take as many photos as I would've liked.

Ingredients:
  • 3 cups All-purpose Flour
  • ¼ cups Sugar
  • ¾ teaspoons Salt
  • Lemon Zest of 1 lemon
  • ¼ ounces, fluid Yeast
  • ¼ cups Warm Water
  • 4 whole Eggs
  • 1 cup Whole Milk [or 1/2 Cup Evaporated Milk]
  • 2 Tablespoons Oil
  • Oil For Deep Frying
  • Sugar For Sprinkling
Sift together:
  • All purpose flour
  • sugar
  • salt
  • lemon zest
Dissolve yeast in warm water

In a small bowl, combine:
  • eggs
  • milk
  • oil
Add mixture to dry ingredients and add yeast, mixing well.

The dough will be more wet & batter-like. Place dough in a well oiled bowl and cover with a damp cloth. Let rise until it doubles in size.

Heat oil for deep frying. Drop dough into hot oil by the teaspoonful, until brown.

To test for doneness: Using a toothpick or skewer, insert into the center. It should come out clean when fully cooked.

Let drain on a paper towel.

Put about 1/2 cup of sugar in a brown paper bag. While the donuts are still warm, place into the brown paper and shake to coat.
 

Sunday, January 31, 2010

Sesame Soy Chicken Salad

I have to admit, my cousin's wife [who IS Chinese] makes the best Chinese chicken salad. Ever. No question. In spite of having the recipe, I can't seem to make it like she does.  I think she's holding out on some secret ingredient.  Some day, I promise to share this crack like salad with you guys...but not just yet.

A close second to this dressing is one that I normally use for my somen salad - Sesame Soy Chicken Salad Dressing Recipe. Because I'm trying to lose some post holiday weight, I've decided to play with the recipe a bit and cut out the fried wonton skins and maifun [it really DOES make the salad] but feel free to put it back in!

Lettuce greens of your choosing
arugula [I took some from my garden]
carrots
dried cranberries
slivered almonds

Chicken breast, shredded

Dressing Recipe:
1/4 cup sugar
1/2 cup oil [i used canola]
1/4 cup soy sauce
2 tsp salt
6 Tbsp vinegar [i used rice wine vinegar but any white vinegar will do]
1/4 cup white sesame seeds, toasted
2 tsp sesame oil

mix together ingredients until combined and sugar is melted. Toss over salad ingredients listed above.

Link Within

Related Posts with Thumbnails

wibiya widget