
Hi, guys!! I've finally made the move!!
Please visit me [and my latest post, Almond Tea Cake] at www.devourtheworld.com
Please be sure to subscribe over at the new site, too!!!
Monday, March 7, 2011
Monday, January 24, 2011
Deliciously Organic: Chocolate Chip Cookies
 |
| Blogger Special: $27.99 if you purchase by February 10th at www.ifpinc.com |
I first met Carrie Vitt nearly a year ago through a mutual friend, Helen of Tartelette, who photographed Carrie's book. Helen told me that I would love Carrie. She wasn't kidding - Carrie is one of the most genuine, thoughtful people I know...and she has this wicked ability of really seeing you and hearing what you're saying, even when you're not saying it. With this woman, there's no place to hide and I love her for it.
I have to admit, I never really jumped on the "organic" bandwagon. I only bought organic when it was cheaper or more convenient and never really went out of my way to buy it. Carrie managed to breakdown organic foods to me in a way that made it manageable and not overwhelming. Carrie's words won me over [paraphrased]: "Start small. Just make one change in your food habits at a time and work your way up." I loved that she wasn't an Organics Snob about it and made the possibility of incorporating more Organic foods into my life realistic and sensible.
I was so thrilled to receive her new book, "Deliciously Organic". Carrie savors the taste of good food and is unwilling to sacrifice taste for healthier options. Instead, she skillfully manages to strike a perfect balance between good taste AND healthier options. I appreciate that she incorporates whole wheat, grains, and only the best ingredients. Delving into the book, I saw the careful consideration to quality and nutritional value of each of the ingredients listed in her recipes.
The first treat I ever tried from Carrie was her Chocolate Chip Cookie that she brought to the Share our Strength Food Blogger Bake Sale. The cookies had an amazing depth in richness of flavor that I don't normally find in other chocolate chip cookies. Even before opening the cookbook, I knew that the Chocolate Chip Cookies recipe was the one I wanted to make first.

Chocolate Chip Cookies
from Deliciously Organic
Ingredients:
1 cup [110 gr] rolled oats, ground fine in a food processor or blender
2 cups [260 gr] whole wheat pastry flour, preferably freshly ground
1 1/2 cups [225 gr] whole wheat flour, preferably freshly ground
1 1/4 teaspoons salt
1 1/2 teaspoons baking soda
1 cup [230 gr] butter, softened
1 cup [185 gr] whole cane sugar or Sucanat
1 cup [120 gr] muscovado sugar
2 teaspoons vanilla extract
2 large eggs
2 cups [190 gr] semisweet chocolate chips
Preheat over to 350 F [180 C] and adjust rack to middle position. Line two cookie sheets with parchment paper.
Stir together oats, whole wheat pastry flour, whole wheat flour, salt, and baking soda in a medium bowl. Beat butter in a large bowl with electric or standing mixer on medium speed until creamy, about 1 minute. Add cane and muscovado sugars and beat until combined. Add vanilla and then eggs, one at a time. Scrape sides of bowl. With mixer on low, gradually add the dry ingredients until just combined. Stir in chocolate chips.
Scoop cookie dough onto line baking sheets using a 2 inch [5.1 cm] cookie scoop. Bake for 12 - 14 minutes, until set and golden brown on top.
Monday, January 3, 2011
Wait, What?? 2011 already???
I don't know how it happened. Another year slipped by right out from under me and I'm not 100% sure I was fully conscious for parts of it. Like summer. I don't think I had a real summer. The cool summer weather in Southern California was much more recognizable as Fall or Winter than of an actual summer, hence my feeling of being cheated out of a summer. Since my battle with time is a losing campaign, I must look ahead.
2011 is a milestone year for me as I turn another decade older [Geez...did I just share that information???]. No longer will I be able to check off the 35 - 39 box. Luckily, this time I'm not scared or freaked out as I was when I left my 20's. My 30's were fantastic years...I traveled, I worked, I ran, and I met a huge host of people. I expect my 40's to be even better years since the things that worried me in my 20's and 30's seem so insignificant compared to the bigger picture of life. I've learned to appreciate people and things so much more now that I've actually had a chance to live a little.
Losing a dear friend who barely turned 30 opened my eyes to what really matters in life - good health, good friends & family members, and just being - having the opportunity to wake up in the morning or sleep in all day. Yes, having a job is important but is having a job that you hate more important than your general well being? That's for you to decide...I'm blessed with a job that I love and am excited to go to every single day. I took a pay cut when I first came to this job because it meant more to me to love my job than what I had in my bank account.
This past year, I've had the opportunity to develop my other passions - knitting, cooking and traveling. Most importantly, I've been richly blessed by all the people I've met and now call "friends". While they are too numerous to mention here [and you know who you are!!!], each person I have met has enriched my life for the better and I appreciate you. The Japanese have a New Year's saying, "Akemashite omedetou gozaimasu. Kotoshi mo yoroshiku onegai shimasu," or "Happy New Year. I hope to count on you again this year."
At the beginning of this New Year, I'd like to share with you my favorite sweet, hoping that it'll leave a sweet taste in your mouth all year long - The Scotchmallow. See's candy makes this and I literally dig through the box to seek it out. All other chocolates in the box are rubbish as far as I'm concerned.

I've been dreaming about this candy for weeks and sadly, I didn't receive one box of See's candy this year. It was something I had to rectify by making my own. The best caramel recipe came from La Fuji Mama's site. The easiest marshmallow recipe was Alton Brown's. Combine these two and you get the ScotchMallow!
Caramel Recipe:
Obtain from La Fuji Mama's Creamy Caramel Recipe.
Instead of boiling to 245 degrees, bring it down to 235 - 240 degree soft ball stage on your candy thermometer.
Obtain from La Fuji Mama's Creamy Caramel Recipe.
Instead of boiling to 245 degrees, bring it down to 235 - 240 degree soft ball stage on your candy thermometer.
Directions: Line a 9 x 13 pan with parchment paper so removal will be easier. Pour caramel into pan and allow to cool completely. Gently wipe off with a paper towel any excess grease/oil.
Marshmallow Recipe
adapted from Alton Brown
Ingredients:
3 packages unflavored gelatin1 cup ice cold water, divided
12 ounces granulated sugar
1 cup Glucose Syrup [or Light corn syrup]
1/4 teaspoon salt
1 teaspoon Vanilla Extract
Powdered sugar for dusting
Have a cookie sheet lined with parchment paper or silpat prepared and dusted with powdered sugar so the mixture will not stick to the liner.
Place 1/2 cup of water with the gelatin into your mixing bowl, set aside.
Combine remaining water, sugar, glucose syrup and salt in a heavy saucepan and cook until it reaches 240 degrees on your candy thermometer. Remove from heat immediately.
Turn mixer on slow speed and slowly pour syrup into mixing bowl [using a stand mixer will be so much easier than a hand mixer]. Once you have added all the the syrup into the mixing bowl, turn on high and mix until the marshmallow becomes lukewarm, approximately 10 - 15 minutes. Add vanilla about 20 - 30 seconds before you are ready to turn off the mixer.
Pour a little more than half the marshmallow batter over the caramel using an oiled or wet spatula. Flatten out as much as possible and sprinkle powdered sugar over the marshmallow. Allow to set for approximately 4 hours.
Pour the remaining batter on to the cookie sheet, sprinkle with more powdered sugar and allow to set. You can use this marshmallow for hot cocoa or smores!
When the caramel/marshmallow mixture has set, turn out onto a cutting board and cut into squares or desired shapes. I was lazy and didn't want to spend hours dipping them so I made them fairly large.

Chocolate sauce:
I opt to microwave my semi sweet chocolate morsels 1 cup at a time. Dip each caramel/marshmallow into the chocolate sauce and place to dry on a parchment lined cookie sheet.
I think I may have put my colleagues into sugar shock this morning so it really is better if you cut these into 1" squares instead of the 2" behemoths that I made.
Sunday, December 19, 2010
Pomegranate Yogurt Parfait

One thing that was ridiculously easy but so tasty was my pomegranate yogurt parfait. Personally, I suspect it may have been the dollop of whipped cream that was the true winner and reason why my friends loved it so much, but the most important thing was that they enjoyed it!
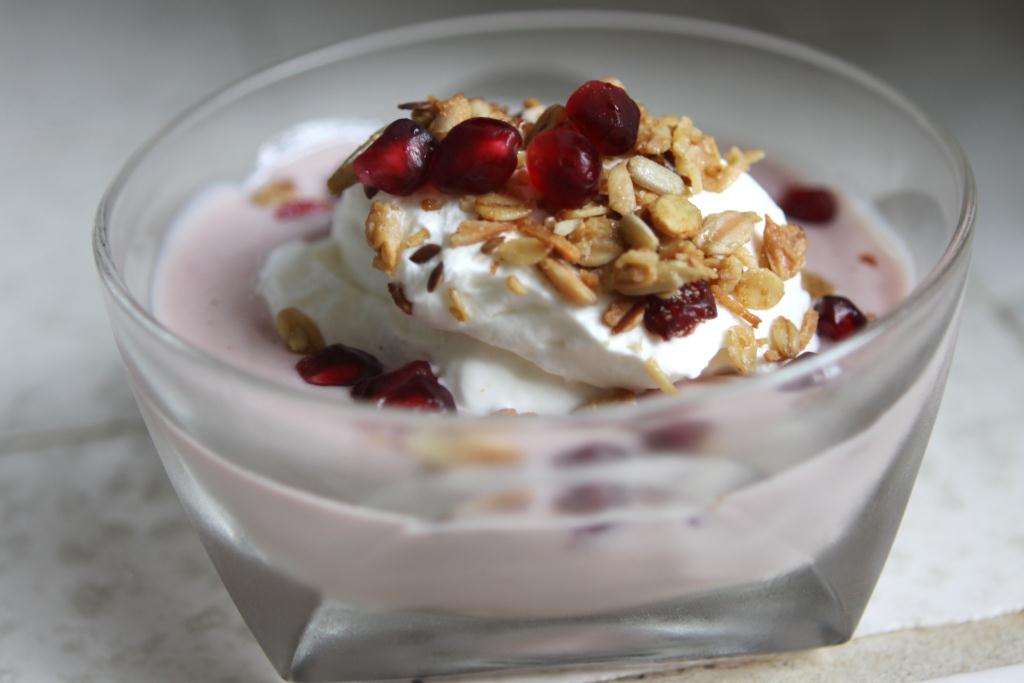
16 oz PomWonderful Pomegranate Juice
1/4 - 1/2 cup sugar
Juice & Zest of 1 lemon
Combine all ingredients and cook, stirring occasionally, until the mixture is thick enough to coat the back of a spoon. If you can draw a clear line through the coating of Pom Syrup with your finger, then it is ready.
Whipped Cream:
16 oz of heavy whipping cream
1/4 cup sugar
1 tsp vanilla
Whip cream, sugar, vanilla together.
Vanilla Yogurt [or Plain Greek Yogurt]Granola
Pomegranate Arils
Mix Pomegranate Syrup with the Yogurt until well blended. Add dollop of whipped cream, top with Granola & Pomegranate Arils.
Tuesday, December 14, 2010
Share Our Holiday Table: Pom Pie Delight
More than 17 million children struggle with receiving regular nutritious meals every day. This doesn't happen in some far off land. It happens right here in the USA. During the season of lavish parties, gifts, and merriment, many are struggling with receiving the most basic of needs.
How you can help: go to the Share Our Holiday Table's donation page and PLEASE make a donation.
How I'm helping: When my friend, Gaby, asked if I'd like to participate in a progressive blogger dinner to raise awareness of childhood hunger in the US, I jumped at the chance. I love this community I'm involved in and am always thrilled when I have the opportunity to join others in such a wonderful event.
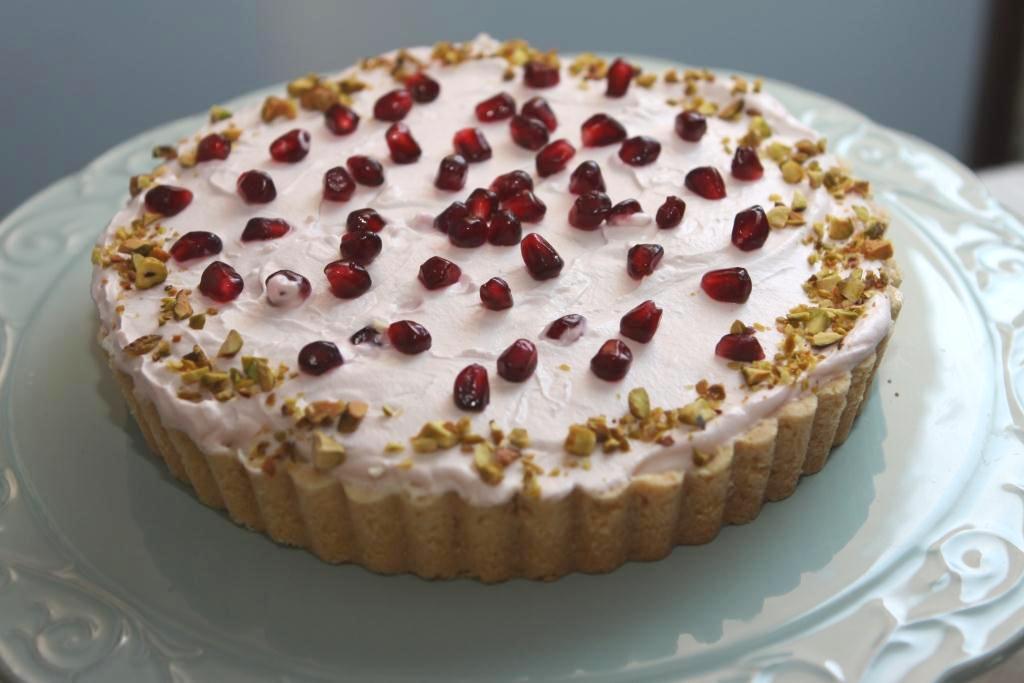
My contribution is dessert, my favorite part of any meal. I'm not a big fan of overly sweet desserts so it took me a while to Frankenstein this dessert from various other recipes I had in my file and tweak it a bit. The shortbread crust is just buttery enough to pull it together beautifully; the tangy cream cheese is lightened up with whipped cream; and it's topped with a wonderfully tangy sweet Pomegranate Mousse that just tastes like silk in your mouth.
2 cups flour
1/4 cup sugar
1 cup cold butter, cubed [2 sticks]
3/4 cup pistachio nuts [optional]
Place flour & sugar into a food processor and pulse twice. Add chilled butter and pulse several times until the texture is grainy. If you don't have a food processor, use a pastry blender or 2 forks to get to the grainy texture. Add nuts at this point. Press all the ingredients into a 9x13 pan or less than 1/2 the ingredients into a 8" tart pan. Bake at 350 for 15 - 20 minutes. Let cool.
Cream Cheese Filling:
1 8oz package of Cream Cheese, room temperature
16 oz of heavy whipping cream, whipped with 3 tablespoons sugar
1/4 - 1/2 cup of sugar, suit to taste
1 tsp vanilla
Blend Cream Cheese with sugar until well combined. Add vanilla, fold in whipped cream. Pour on cooled crust and refrigerate until set.

Pomegranate Mousse topping:
8 oz PomWonderful 100% pomegranate juice
1/3 cup sugar
Juice from 1/2 lemon
Zest from 1 lemon
1/2 package of gelatin
8 oz heavy whipping cream, whipped with 1 tablespoon sugar and 1/2 tsp vanilla
Combine PomWonderful Pom Juice, sugar, juice, and zest in a medium sized saucepan. Reduce until half or until it reaches a syrup consistency [should coat the back of a spoon]. Let Cool. Once the Pom syrup has cooled, fold into whipped cream. Pour over cream cheese filling and refrigerate until set.
Decorate with Pistachio nuts & pomegranate arils, if available.

For more recipe ideas, please visit the talented and lovely blogs of my foodie friends.
December 14: Dessert
Gourmet
- Little Bo Bakes (read the post)
- Hunter Angler Gardener Cook (read the post)
- TableFare (read the post)
- Cooking On the Side (read the post)
- Devour The World (read the post)
- Hoosier Homemade (read the post)
- For the Joy of Food (read the post)
- Daydreamer Desserts (read the post)
- The Food Junkie (read the post)
Gluten Free
- Tartelette (read the post)
- Cook It Allergy Free (read the post)
- Gluten Free Girl
- The Blog (read the post)
Gourmet
- The Urban Baker (read the post)
- Heather Christo (read the post)
- We Like to Cook, and Eat (read the post)
- Plum Pie (read the post)
- What’s Cooking (read the post)
- Dine and Dish (read the post)
- The Evolving Cook (read the post)
- Katrina Runs for Food
Gluten Free
- The Whole Gang (read the post)
- Jenn Cuisine-- A mostly gluten free cooking blog. (read the post)
- Creative Cooking Gluten Free (read the post)
Gourmet
Family Friendly
Vegetarian
Gluten Free
December 9: Soup
Gourmet
- edible cville (read the post)
- The Runaway Spoon (read the post)
- A Girl, A Market, A Meal (read the post)
- Ladles and Jellyspoons (read the post)
- Two Dollar Dinners (read the post)
- All About Alton Brown (read the post)
- Cookie Central's Great American Bake Sale (read the post)
Gluten Free
- Celiac Teen (read the post)
- Celiacs in the House (read the post)
- Gluten Free Life with Jen (read the post)
- And Love it Too! (read the post)
Gourmet
Family Friendly
Vegetarian
Gluten Free
December 7: Drinks
Gourmet
- Food Woolf (read the post)
- The Gringo Chapin (read the post)
- Neo-Homesteading (read the post)
- Three Many Cooks (read the post)
Vegetarian
Gluten Free
December 6: Appetizers
Gourmet
Family Friendly
Vegetarian
Gluten Free
Sunday, December 5, 2010
Agedashi Dofu

I had the most amazing Agedashi Dofu the other night. My friend's [Fuyumi] mom is an incredible Japanese cook so when Mrs H asked me if I'd like to help out at a dinner she was hosting, I jumped at the chance. One thing to note about Japanese Cuisine is that it is very labor intensive. Making renkon [lotus root] and carrots look like little flowers may have looked lovely but I was ready to stab myself over the laboriousness of it all. Not to say that I'm not going to do that for my family's New Year's party. I think the memory of how long it really took will be gone by the time New Year's comes around.
There were so many wonderful items on the menu but my favorite was definitely the Agedashi Dofu. Deep fried tofu steeped in salty sweet richness of the tsuyu [soup], it was impossible to resist. This was always something I would only order at restaurants, but Mrs H assured me that this was the easiest thing in the world to make. She was right.
Firm tofu tends to be easier to handle but I prefer the consistency of the softer silken tofu, which makes for a creamier inside of the crispy shell. Press out as much of the water as possible [my mom uses jars filled with water placed on top of plates, placed on top of the tofu].
I've seen various types of batter from tempura and flour to katakuriko [potato starch]. Mrs H uses katakuriko to flour the tofu.

After heating up the oil, gently drop the tofu into the oil and allow to deep fry until the exterior is firm and crisp. Turn over and repeat.

Top the tofu with various colorful items such as spinach, katsuobushi, green onions, daikon sprouts, asparagus, tomatoes, grated ginger & daikon. Pour the tsuyu over the tofu and serve immediately.
Best dish ever.
Tsuyu Base:
1 cup dashi [my friend, Rachael, has a WONDERFUL explanation on how to make it!]
2 Tbsp Shoyu [soy sauce]
2 Tbsp Mirin [Sweet Rice Wine]
Combine tsuyu ingredients and keep warm until ready to use.
After draining tofu of water, coat tofu with flour. Deep fry until shell is crisp and firm. Pour Tsuyu base over tofu.
Tuesday, November 30, 2010
Holiday Gifts: My Travel Essentials Gift List
While I can not say that I'm a travel expert, therefore knowing exactly what constitutes "essential" travel items, I can at least say what works for me on my [mostly] business travel. I can't believe I travel with all this stuff but most of these things I need for my work, sanity, or pleasure.
 1.) USB Charger/Travel Plug Adapter: $10 - $20. This is my non-sexy item, I've had it for years but I use it on every trip. It's pretty essential for me so that I don't have to carry around several different plugs - just the cables for my electronics. I charge my iPod, Nook, Flip, Camera, and other odds & ends.
 2.) Stowaway Bag from Flight 001 - $30. I love this thing - it packs down into a size small enough that I just throw it in to my front compartment of my suitcase. I do a lot of shopping on my trips and it's always handy to have an extra bag, just in case.
 3.) Luggage Scale $20. I've got heavy clothes. Or maybe its my shoes. Or maybe it's the hairdryer, curling iron, and hair gels. Whatever the case, when I'm checking my luggage in for business trips, I always seem to have difficulty staying within my weight limit. A small lightweight contraption that helps in my quest to stay within the regulations.
 4.) Travel Toothbrush Sanitizer $30. Ok, I don't use a sanitizer at home. Having said that, I also admit to the fact that I have a dedicated toothbrush that I travel with from trip to trip. I don't do anything with my toothbrush in between my trips because I'm too lazy when I get home to sanitize and I'm usually packing at the last minute, not thinking about my toothbrush. So I really like the feeling of cleanliness that this sanitizer provides.
 5.) Make your own kit: eye mask, ear plugs, lightweight socks, travel slippers. On long haul flights, it makes your flight just a little more bearable. I travel with a small, lightweight eye mask, not this one below, but it just makes me want to burrow into it, it looks so soft & comfy [$35, Brookstone or Amazon]
 6.) Bose QuietComfort 15 [$299.95]. I hate saying that expensive items are necessary for travel. It's not. But let me tell you, this baby makes all the other noisy babies go away, or at least their cacophony of noise. I took this to Japan with me and it even helped me tune out my family, too!

 8.) Mino Flip: Definitely not a necessity but sometimes you just need to capture the moment. I use mine mostly for work on Site Inspections to give a more realistic view of what I'm seeing. Plus, if someone suddenly decides to break out in song or other embarrassing acts, I can capture it in a split second. Plus it comes with its own editing software that you can pair to music. I love the convenience of the Flip.
 9.) E-Reader: I read like a maniac. I can finish an entire book in mere hours. This little device will store hundreds of books so even I would be hardpressed to read all my downloaded books on a single trip. I personally use a Nook by Barnes & Noble mostly because of the SD card option that I could use to store additional books so I can essentially never run out of memory.
 10.) iPad: I don't have this thing but it is pretty high on my list of things I need [want] to get. I'd love to lighten my load as much as possible and this would help me immensely, especially since I'm a control freak and can't manage to unplug from the office/life/home completely. From basics of sending emails to the immensely helpful translators/guidebooks/travel notes, these travel tools are a sexy must have for any traveler [plus i can use it as an e-reader and update my blog!].
7.) Camera: $315 - $350 This one is a no brainer. If you're traveling, what better way is there to capture the moment than a handy point & shoot? I am a self proclaimed Canon Girl but my brother brought out his new Panasonic Lumix camera to our family trip to Japan. What I love most about it was the GPS system that marked where your photo was taken so you don't have to go through your notes and timelines to try and figure things out!

Subscribe to:
Posts (Atom)


